So far, we have worked with data sets that have been collected, cleaned, and curated by machine learning researchers and practitioners. Datasets like MNIST and CIFAR are often used as toy examples, both by students and by researchers testing new machine learning models.
In the real world, getting a clean data set is never that easy. More than half the work in applying machine learning is finding, gathering, cleaning, and formatting your data set.
The purpose of this lab is to help you gain experience gathering your own data set, and understand the challenges involved in the data cleaning process.
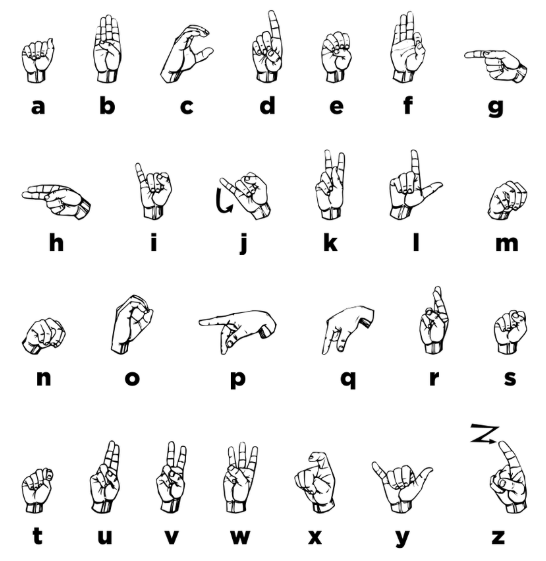
American Sign Language (ASL) is a complete, complex language that employs signs made by moving the hands combined with facial expressions and postures of the body. It is the primary language of many North Americans who are deaf and is one of several communication options used by people who are deaf or hard-of-hearing.
The hand gestures representing English alphabet are shown below. This lab focuses on classifying a subset of these hand gesture images using convolutional neural networks. Specifically, given an image of a hand showing one of the letters A-I, we want to detect which letter is being represented.
We will produce the images required for this lab by ourselves. Each student will collect, clean and submit three images each of Americal Sign Language gestures for letters A - I (total of 27 images)
Steps involved in data collection
To simplify the machine learning the task, we will standardize the training images. We will make sure that all our images are of the same size (224 x 224 pixels RGB), and have the hand in the center of the cropped regions.
You may use any of the following applications to crop and resize your images:
Preview:
Photos app to edit and crop the image and keep the aspect ratio a square.Paint to resize the image to the final image size of 224x224 pixels.You may also use online tools such as http://picresize.com
Please do not edit your photos in any other way. You should not need to change the aspect ratio of your image. You also should not digitally remove the background or shadows—instead, take photos with a white background and minimal shadows.
Images will be accepted and graded based on the criteria below
Submit a zip file containing your images.
student-number_Alphabet_file-number.jpg (e.g. 100343434_A_1.jpg).last-name_student-number.zip (e.g. last-name_100343434.zip).We will be anonymizing and combining the images that everyone submits. We will announce when the combined data set will be available for download.
For this lab, we are not going to give you any starter code. You will be writing a convolutional neural network from scratch. You are welcome to use any code from previous labs, lectures and tutorials. You should also write your own code.
You may use the PyTorch documentation freely. You might also find online tutorials helpful. However, all code that you submit must be your own.
Make sure that your code is vectorized, and does not contain obvious inefficiencies (for example, unecessary for loops, or unnecessary calls to unsqueeze()). Ensure enough comments are included in the code so that your TA can understand what you are doing. It is your responsibility to show that you understand what you write.
This is much more challenging and time-consuming than the previous labs. Make sure that you give yourself plenty of time by starting early. In particular, the earlier questions can be completed even if you do not yet have the full data set.
Submit a PDF file containing all your code, outputs, and write-up from parts 1-5. You can produce a PDF of your Google Colab file by going to File > Print and then save as PDF.
Do not submit any other files produced by your code.
Include a link to your colab file in your submission.
Build a convolutional neural network model that takes the (224x224 RGB) image as input, and predicts the letter. Your model should be a subclass of nn.Module. Explain your choice of neural network architecture: how many layers did you choose? What types of layers did you use? Were they fully-connected or convolutional? What about other decisions like pooling layers, activation functions, number of channels / hidden units?
Write code that trains your neural network given some training data. Your training code should make it easy to tweak the usual hyperparameters, like batch size, learning rate, and the model object itself. Make sure that you are checkpointing your models from time to time (the frequency is up to you). Explain your choice of loss function and optimizer.
One way to sanity check our neural network model and training code is to check whether the model is capable of “overfitting” or “memorizing” a small dataset. A properly constructed CNN with correct training code should be able to memorize the answers to a small number of images quickly.
Construct a small dataset (e.g. just the images that you have collected). Then show that your model and training code is capable of memorizing the labels of this small data set.
With a large batch size (e.g. the entire small dataset) and learning rate that is not too high, You should be able to obtain a 100% training accuracy on that small dataset relatively quickly (within 200 iterations).
Download the anonymized data collected by you and your classmates. Split the data into training, validation, and test sets.
Note: Data splitting is not as trivial in this lab. We want our test set to closely resemble the setting in which our model will be used. In particular, our test set should contain hands that are never seen in training! Remember that test sets are used to estimate how well the model will generalize to new data, and that “new data” will involve hands that the model has never seen before.
Explain how you split the data, either by describing what you did, or by showing the code that you used. Justify your choice of splitting strategy. How many training, validation, and test images do you have?
For loading the data, you can use plt.imread as in Lab 1, or any other method that you choose. You may find torchvision.datasets.ImageFolder helpful. (see https://pytorch.org/docs/master/torchvision/datasets.html#imagefolder ) For this portion only, you are free to look up tutorials or other code on the internet to help you.
Train your first network on your training set. Plot the training curve, and include your plot in your writeup. Make sure that you are checkpointing frequently!
List 3 hyperparameters that you think are most worth tuning. Choose at least one hyperparameter related to the model architecture.
Tune the hyperparameters you listed in Part (a), trying as many values as you need to until you feel satisfied that you are getting a good model. Plot the training curve of at least 4 different hyperparameter settings.
Choose the best model out of all the ones that you have trained. Justify your choice.
Report the test accuracy of your best model. You should only do this step once.
For many image classification tasks, it is generally not a good idea to train a very large deep neural network model from scratch due to the enormous compute requirements and lack of sufficient amounts of training data.
One of the better options is to try using an existing model that performs a similar task to the one you need to solve. This method of utilizing a pre-trained network for other similar tasks is broadly termed Transfer Learning. In this assignment, we will use Transfer Learning to extract features from the hand gesture images. Then, train a smaller network to use these features as input and classify the hand gestures.
As you have learned from the CNN lecture, convolution layers extract various features from the images which get utilized by the fully connected layers for correct classification. The AlexNet architecture played a pivotal role in establishing Deep Neural Nets as a go-to tool for image classification problems and we will use an ImageNet pre-trained AlexNet model to extract features in this assignment.
Here is the code to load the AlexNet network, with pretrained weights. When you first run the code, PyTorch will download the pretrained weights from the internet.
The alexnet model is split up into two components: alexnet.features and alexnet.classifier. The first neural network component, alexnet.features, is used to compute convolutional features, which are taken as input in alexnet.classifier.
The neural network alexnet.features expects an image tensor of shape Nx3x224x224 as input and it will output a tensor of shape Nx256x6x6 . (N = batch size).
Compute the AlexNet features for each of your training, validation, and test data. Here is an example code snippet showing how you can compute the AlexNet features for some images (your actual code might be different):
# img = ... a PyTorch tensor with shape [N,3,224,224] containing hand images ...
features = alexnet.features(img)
Save the computed features. You will be using these features as input to your neural network in Part (b), and you do not want to re-compute the features every time. Instead, run alexnet.features once for each image, and save the result.
Build a convolutional neural network model that takes as input these AlexNet features, and makes a prediction. Your model should be a subclass of nn.Module.
Explain your choice of neural network architecture: how many layers did you choose? What types of layers did you use: fully-connected or convolutional? What about other decisions like pooling layers, activation functions, number of channels / hidden units in each layer?
Here is an example of how your model may be called:
# features = ... load precomputed alexnet.features(img) ...
output = model(features)
prob = F.softmax(output)Train your new network, including any hyperparameter tuning. Plot and submit the training curve of your best model only.
Note: Depending on how you are caching (saving) your AlexNet features, PyTorch might still be tracking updates to the AlexNet weights, which we are not tuning. One workaround is to convert your AlexNet feature tensor into a numpy array, and then back into a PyTorch tensor.
Report the test accuracy of your best model. How does the test accuracy compare to part 4(d)?