Combined HTML Documentation
This file combines all of the Markdown documentation into one HTML file. Hopefully this makes it easier to distribute as needed. If you need to regenerate this file, run python generate_html_docs.py.
This file was generated on 2016-08-26 11:51
- Combined HTML Documentation
- AutoTank Tutorial
- Academic Background
- Arbiters
- Behaviors
- README
- Disclaimer
- License
- End Game Conditions
- Scoring
- Time Limit
- Assigning Teams
- Agent Persistence
- Coding Style
- FAQ
- When is Awake, Start, Update, FixedUpdate, etc. called?
- Private Class Members Are Reset When I Hit Play
- A white box appears around the tank's health bar even when it should be hidden by Fog of War
- A green box gives the enemy tank position away
- Changes made to GameObject using a custom editor/inspector don't stick when I hit Play
- I can fire the tank's gun and rotate its turret, but I cannot move (PlayerControlled)
- Help, I need to time a Function/Method
- These Behavior/Arbiter/Argument names are long, why not make them shorter?
- Why is there a [TOC] in these Markdown files?
- Versioning
- Version 3.0.0
- Version 2.0.0
- Version 1.1.0
- Licensing
AutoTank Tutorial
Disclaimer
The views expressed are those of the author and do not reflect the official policy or position of the United States Air Force, Air Force Institute of Technology, Department of Defense, or the U.S. Government.
Introduction
This tutorial is meant to introduce you to the basics of AutoTank and the Unified Behavior Framework (UBF). By the end of this tutorial, you should be able to create your own UBF Behaviors, Arbiters and combine them to form your own agents.
AutoTank's Rules
AutoTank is a simple 2D tank game. The objective is to destroy the other tank(s) before they do the same to you. This part of the tutorial is meant to teach you the basic rules of the game and to get you thinking about how you might program your tank. To do this, you will play against the AI, using the mouse and keyboard to control the tank.
How to Control the Tank
To move forward, press the W key. To move backward, press the S key. Left and right are the A and D key respectively.
The turret will point toward the mouse cursor, which is a green crosshair while you play the game. Note that the turret does not rotate instantaneously.
To fire the turret, click the left mouse button. Note that the firing rate is limited. The tip of the turret will light up red when it is ready to fire. If you hold the fire button down, it will fire whenever possible.
Tank Field of View
When you are controlling the tank, the game will draw a "fog of war" that shows your field of view and the walls of the map (see below). This field of view mirrors that of the AI tanks, and thus the information you will be working with when you program your own agents.

Winning
Tanks take damage from bullets and from running into other tanks. A tank's current health is displayed as a red and green bar along its tracks (see screenshot below). When a tank has received too much damage, it will be removed instantly from the game. The last tank alive wins at which point a dialog box will appear declaring the winner. It will ask you if you want to reset the scene. Feel free to play as many times as you like to get a feel for the controls and rules of the game.

How to Pause the Game
To pause Unity, click the pause button near the play button in the Unity editor. Click it again to resume.
Notes
If you cannot move at the start of the game, use your mouse to click anywhere in the scene. This is due to the game not having focus and thus not receiving input.
How to Play AutoTank (via Mouse and Keyboard)
- if Unity is not already open, start Unity
- from Unity, click on File and then Open Scene
- open the
AutoTank/Assets/Scenes/Tutorial-1.unity - this should open the proper scene for this section
- near the top of the window in the center, there should be a play button that will start the game (see screenshot)
- when one of the tanks win, the game will ask you to reset the scene
- feel free to play as long as you like

Basics of UBF and Unity
Now that you know the basic rules of the tank simulation, the rest of the tutorial will focus on programming the tanks (autonomous agents). This particular section will teach you more about Unity, AutoTank and the Unified Behavior Framework (UBF). It will end by having you modify an existing agent to find and shoot the enemy.
Documentation is available for all three pieces (Unity, AutoTank and the UBF) to supplement this tutorial. Some common problems are addressed in the AutoTank/README.md. If that doesn't address your issue, try looking over the code in question which may have additional documentation. If you still have questions, email me (josh.s.ziegler@gmail.com).
What Is Unity?
Unity is a video game engine, similar to the Unreal or id Tech engines. A game engine is a software framework meant to speed up development and provide common functionality such as graphical, audio and networking systems. In addition, many offer build systems supporting multi-platform development and debugging support.
AutoTank -- the tank simulation we will be using -- is implemented in Unity. Specifically, AutoTank is implemented in the C# (C-sharp) language using the open source Mono runtime. If you're familiar with Java (or any other high-level, OOP, managed runtime languages), C# should be fairly easy to adjust to. If not, this might be good time for you to do a quick C# tutorial.
What is the Unified Behavior Framework
AutoTank uses the Unified Behavior Framework (UBF) for its agent architecture. The UBF can be thought of as a software design pattern for building autonomous agents.
In its simplest form, the UBF calls your code with the current world's state as an argument (e.g. enemy positions, your heading, speed). Your code will then use that information to create and return an action for the agent to execute. Your code cannot execute actions on its own, nor can it read data from any sensors on its own. In fact, the Action you return in considered to be a vote rather than a command. This level of separation is important later on.
The part of the UBF that calls your code is called the Controller and it handles the event loop. On a set schedule, the Controller updates the world State object using the agent's sensors. It then calls your code to request an Action (vote).
Your code will be in what is called a Behavior. A Behavior's only job is to take in the State object and return an Action object. The Action object tells the Controller what you want it to do, such as "set the engine to 50%" or "turn right at full speed" or "fire the gun."
In the case of AutoTank, there is no way to tell the Controller to "drive to point A." You must control the individual "motors" manually. This is meant to mimic the controls of a typical hardware robot.
Example Do-Nothing Behavior
The following is code for an empty, do-nothing Behavior:
namespace AT{
    namespace UBF{
        namespace Behaviors{

            public class DoNothing : AT.UBF.Behavior {

                protected override AT.UBF.Action genActionInternal(AT.UBF.State state){
                    AT.UBF.Action action = new AT.UBF.Action();
                    return action;
                }
            }
        }
    }
}
The class DoNothing is derived from the type AT.UBF.Behavior and implements its genActionInternal method (generate action). In order to do anything, your Behavior must at least override this method. The namespaces UBF, AT (AutoTank), and Behaviors simply keep the global namespace clean. From here on, these namespaces will be left off to simplify our examples.
Firing The Gun
By default, the AT.UBF.Action object will have NULL for each motor. That means that returning a new Action instance is essentially a no-op (i.e. does not vote). If we want to do something, say fire the turret, we need to change the corresponding action member.
- Open the
AutoTank/Assets/Scenes/Tutorial-2.unityfile - Open the file
AutoTank/Assets/AT.UBF.Behaviors/Tutorial2.csin your code editor - Return to Unity and hit play. The tank should do nothing.
- Hit the play button again which will stop and reset the scene.
- Edit the Tutorial2 Behavior's
genActionInternalmethod to look like this:
protected override AT.UBF.Action genActionInternal(AT.UBF.State state){
    AT.UBF.Action action = new AT.UBF.Action();
    action.fireGun = true;
    return action;
}
Hit play again. Your agent should now be firing its gun, but only in the direction it's currently pointing. To fix that, we need to learn more about the Action class.
The Action Class
The following code is from the AT.UBF.Action class and shows all of the motors you may vote on:
public Nullable<float> driveForward;    // -1.0 to 1.0
public Nullable<float> turnTracksRight; // -1.0 to 1.0
public Nullable<float> turnTurretRight; // -1.0 to 1.0
public Nullable<bool>  fireGun;         // true or false
Think of each motor's value as a percentage of full power (i.e. 1.0 ~ 100% and 0.5 ~ 50%). A negative value is simply in the opposite direction (i.e -1.0 ~ 100% backward). The obvious exception is fireGun which is a Boolean.
Here is an example that rotates the turret right at 80% of full speed.
protected override AT.UBF.Action genActionInternal(AT.UBF.State state){
    AT.UBF.Action action = new AT.UBF.Action();
    action.fireGun = true;
    action.turnTurretRight = 0.8f;
    return action;
}
Edit the Tutorial2.cs file to match the code above, save it and then click play in Unity. Your agent should now rotate its turret constantly, spraying bullets as it goes.
You do not have to vote on each motor. A value of NULL means that you "abstain" from voting for it. NULL is the default value of each motor in a newly created Action object.
Action objects have one last member that will be more important later on: priority. As mentioned before, each Action object is merely a vote on what to do. This priority member is used to indicate the vote's importance. We will return to this topic soon.
Using State to Find the Enemy
Now on to the goal of this section: destroying the enemy tank. Up until now, you have returned an Action but its values were not based on anything. You were "flying blind." Now you need to use the State object to find and destroy the enemy tank. The following code shows some of the more important members of the State object:
public float turretRotation;
public float tracksRotation;
public Vector2 position;
public Vector2 velocity;
public int hp; // health points

// first is position, second is rotation, third is velocity
public List<Triple<Vector2, Quaternion, Vector2>> visibleEnemyTanks;
// first vector is position, second is velocity
public List<Tuple<Vector2, Vector2>> visibleBullets;
// ALL walls are always known/visible
public List<Tuple<Vector2, Vector2>> walls;
For this task, there are no walls in the world (ignoring the boundary walls) so visibleEnemyTanks will hold any tank within our Field of View (FoV).
We know there is an enemy tank in the scene, but our agent currently does not see it. Edit the Tutorial2 Behavior to match the following code:
protected override AT.UBF.Action genActionInternal(AT.UBF.State state){
    AT.UBF.Action action = new AT.UBF.Action();
    if(state.visibleEnemyTanks.Count < 1){
        // rotate turret right at full speed to find the enemy
        action.turnTurretRight = 1.0f;

    }else{ // at least one enemy tank is in sight!
        Vector2 targetPos = state.visibleEnemyTanks[0].first;
        // Point the turret directly at the enemy's position as quickly as possible
        action.turnTurretRight = Util.findShortestTurretRotationToTarget(state.position, targetPos, state.turretRotation);
        // Shoot our gun while the enemy is in view (even if we aren't pointing directly at it yet)
        action.fireGun = true;
    }
    return action;
}
Return to Unity and hit play. Your agent should now find and shoot the enemy. Congrats! You just created your first agent with the UBF.
Loading Single Behavior UBF Agents
You may be wondering how AutoTank loads and saves UBF agents. AutoTank uses Javascript Object Notation (JSON) in flat files to load and save the UBF's tree. If you aren't familiar with JSON, don't worry, it's fairly simple and doesn't require extensive Javascript knowledge. For example, the following is from the AutoTank/Agents/Tutorial-2.json file which loaded your code in the last task:
{
  "BehaviorType": "AT.UBF.Behaviors.Tutorial2"
}
This is the most basic agent you could create with AutoTank and the UBF, with only one Behavior and no arguments. The file has open and closing braces indicating the start and end of a Dictionary (aka associative array or map). The Dictionary holds only one key: BehaviorType. This key is required and its value must be the full class name of the UBF Behavior.
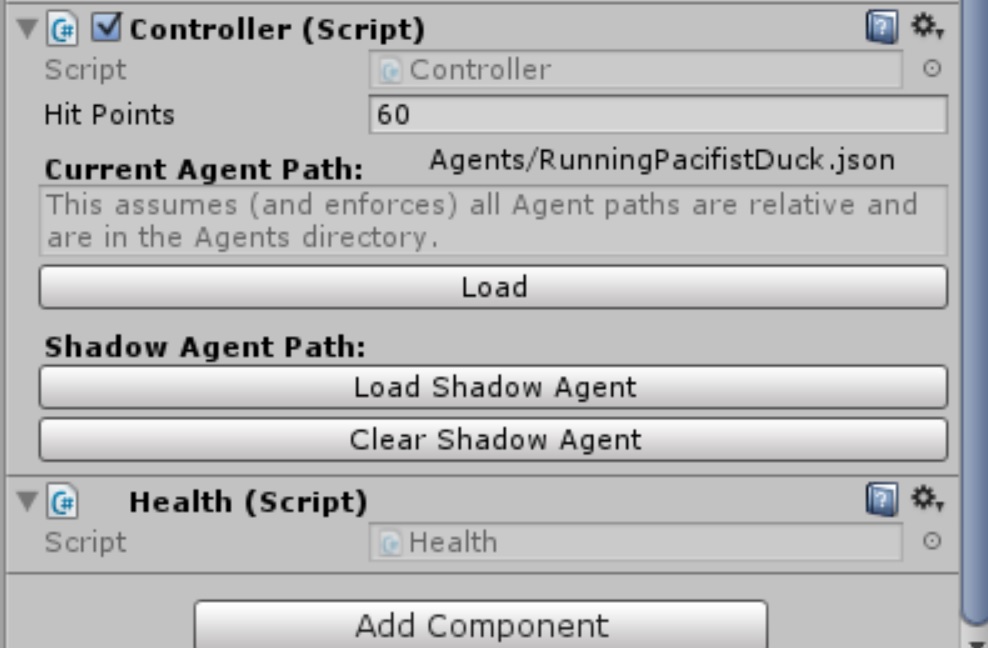
In Unity, you can load these JSON Agent files by:
- selecting a Tank in the scene (from the Hierarchy view)
- finding its
Controllerscript in Unity's Inspector (see screenshot below) - clicking the "Load" button underneath the "Current Agent Path" heading
- choosing the JSON agent file you want to load (must be in the AutoTank/Agents folder)
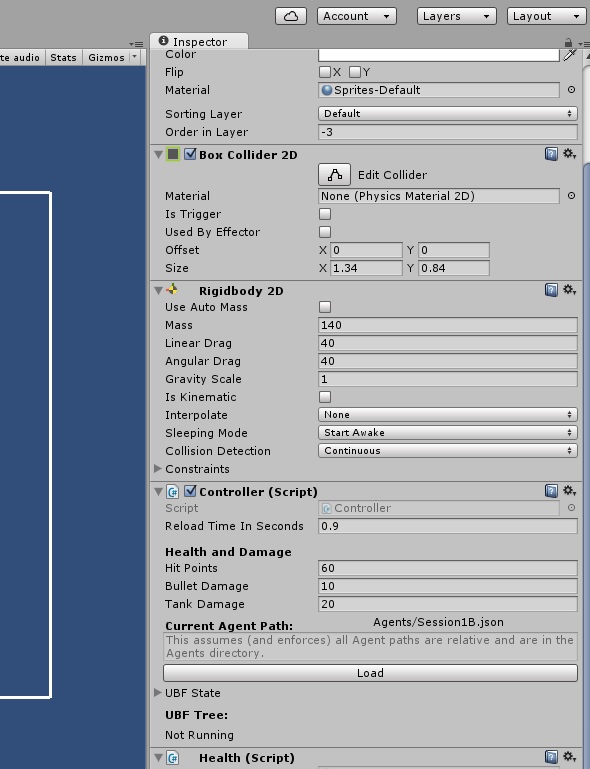
Be sure to check the Console window for any loading errors. JSON syntax errors are the most frequent reason an agent fails to load.
Loading Behavior Arguments
Some Behaviors allow you to alter their behavior using arguments. For example, the Behavior DriveInAStraightLine allows both its speed and priority to be set via arguments (the following code is from DriveInAStraightLine).
/** Drives in a straight line at the desired speed at all times.
 */
public class DriveInAStraightLine : AT.UBF.Behavior {

    public float desiredSpeed = 1.0f;
    public float priority = 0.5f;

    protected override AT.UBF.Action genActionInternal(AT.UBF.State state){
        AT.UBF.Action action = new AT.UBF.Action();

        action.SetTurnTracksRight(0.0f, voteSourceID); // keep heading straight
        action.SetDriveForward(desiredSpeed, voteSourceID);
        action.SetPriority(priority, voteSourceID);

        return action;
    }

    /** Save arguments to a dictionary.
     */
    public override void _ToDict(Dictionary<string, object> dict, bool saveLastAction){
        dict["DesiredSpeed"] = desiredSpeed;
        dict["Priority"] = priority;
    }

    /** Loads arguments from a dictionary, verifying as needed.
     */
    public override void _FromDict(Dictionary<string, object> dict){
        string bName = this.GetType().Name;
        priority = Util.FloatFromJsonDict("Priority", priority, bName, dict);
        desiredSpeed = Util.FloatFromJsonDict("DesiredSpeed", desiredSpeed, bName, dict);
    }
}
This allows multiple agents to customize a Behavior's logic. To load arguments from JSON, you would add a key for each argument you want to set in that Behaviors' Dictionary. For example:
{
  "BehaviorType": "AT.UBF.Behaviors.DriveInAStraightLine",
  "Priority": 1.0,
  "DesiredSpeed": 0.4
}
Before moving on to the next section, try loading the above JSON.
- Create a new file using your editor
AutoTank/Agents/Tutorial-3.json - Paste the above JSON into that file and save it
- From Unity, open
AutoTank/Assets/Scenes/Tutorial-3.unity - Select the tank labeled Agents-Tutorial-2.json (via the Hierarchy window)
- In the Inspector panel (Windows > Inspector), look for the
Controllerscript - Click the "Load" button under the "Current Agent Path" header
- Find the file you just created (
AutoTank/Agents/Tutorial-3.json) - Hit play
The agent you selected should now drive in a straight line. If it doesn't check the Console window for errors (Window > Console). Ask for help if you need it.
Warning: If an argument is listed as a float, it must have a decimal point (i.e. 3 will cause an error but 3.0 will work).
Using Action Setters
You may have noticed that the code for DriveInAStraightLine uses setters to vote on the motors whereas the previous examples simply changed the member value (e.g. action.SetTurnTracksRight(0.8f, voteSourceID) vs action.turnTracksRight = 0.8f). AutoTank assigns each Behavior and Arbiter with a unique voteSourceID, which it uses for various debugging aids. Why this is useful won't be apparent until later, but for now, just know that you should use the setters.
Loading Multi-Behavior UBF Agents
Up until now, you have only used a single Behavior, but the real power of the UBF is in multi-Behavior agents. This allows for code reuse and complex behavior using only a few simple Behavior classes.
The key to multi-Behavior agents, is the CompositeBehavior class. This is a special kind of Behavior that holds a set of child Behaviors. When the Controller calls the CompositeBehavior's genAction method, it in turn calls each of it's children's genAction methods (passing the same State object to each). This results in a set of Action objects, all potentially different from one another. The CompositeBehavior cannot return them all to the Controller, so it uses an Arbiter which takes in a set of Actions and returns one.
There are no rules as to how an Arbiter must work, as long as it returns a single Action object. Some Arbiters choose one of the Actions from the set using some criteria (e.g. vote priority). Others combine the Actions into one. To understand why this is useful and important, let us inspect an existing agent.
- Open the
AutoTank/Assets/Scenes/Tutorial-4.unityfile in Unity - Hit play. The white tank should rotate its turret until it finds the enemy tank at which point it starts shooting (as in
Tutorial2.cs). - Hit stop
The agent shows roughly the same behavior as the agent from Tutorial-2.json, but in Tutorial-4.json we see this:
{
    "BehaviorType": "AT.UBF.CompositeBehavior",
    "Arbiter": { "ArbiterType": "AT.UBF.Arbiters.Priority" },
    "Children": [
        {"BehaviorType": "AT.UBF.Behaviors.FindEnemy" },
        {"BehaviorType": "AT.UBF.Behaviors.PureFire" }
    ]
}
Unlike the agent Session-2.json, this agent is using two Behaviors which are combined using the Priority Arbiter. First, let's look at the FindEnemy Behavior:
/** Turns turret until we are looking directly at an enemy. Once one is in sight, try to point the turret directly at them (pure pursuit).
 *
 *  Does **not** vote on rotating the tracks, driving or firing the gun.
 */
public class FindEnemy : AT.UBF.Behavior {
    public float priorityWhenNoEnemyInSight = 1.0f; // highest priority
    public float priorityWhenEnemyInSight   = 0.1f;
    public float turretTurnSpeedWhenNoEnemyInSight = 1.0f; // rotate at full speed

    protected override AT.UBF.Action genActionInternal(AT.UBF.State state){
        AT.UBF.Action action = new AT.UBF.Action();

        if(state.visibleEnemyTanks.Count < 1){
            action.SetTurnTurretRight(turretTurnSpeedWhenNoEnemyInSight, voteSourceID);
            action.SetPriority(priorityWhenNoEnemyInSight, voteSourceID);
        }else{
            Vector2 targetPos = state.visibleEnemyTanks[0].first;
            //Debug.DrawLine(state.position, targetPos,  Color.red, 1f);
            // Pure pursuit (no lag or lead on turret)
            action.SetTurnTurretRight(
                Util.findShortestTurretRotationToTarget(state.position, targetPos, state.turretRotation),
                voteSourceID);
            action.SetPriority(priorityWhenEnemyInSight, voteSourceID);
        }

        return action;
    }
}
This should look familiar, as we did something similar earlier. However this does not set the fireGun motor and it is setting the priority. Now, look at the PureFire Behavior:
/** Shoots directly at an enemy tank with no lead or lag (pure pursuit aka aim at their current position,
* ignoring their velocity).
*
*  This does NOT vote if no enemy is in sight. When an enemy IS in sight, it tracks the first one in the
*  list.
*
*  When the tracked enemy is outside of our firing zone, only vote on the turret rotation. The firing zone
*  is set via argument, and represents the maximum turret turn rotation that we can vote for and still fire
*  at the enemy. For example, a firing zone of 0.1 means we only fire when we vote to turn the turret at
*  10% of full power.
*/
public class PureFire : AT.UBF.Behavior {

    public float priorityWhenEnemyWithinFiringZone = 1.0f;
    public float priorityWhenEnemyOutsideFiringZone = 1.0f;
    public float firingZonePercentTurretRotation = 0.1f;

    protected override AT.UBF.Action genActionInternal(AT.UBF.State state){
        AT.UBF.Action action = new AT.UBF.Action();

        if(state.visibleEnemyTanks.Count < 1){
            return action; // Do not vote if there isn't anything to shoot
        }

        Vector2 enemyPosition = state.visibleEnemyTanks[0].first;

        // Try to aim directly at the enemy's CURRENT position
        action.SetTurnTurretRight(
            Util.findShortestTurretRotationToTarget(state.position, enemyPosition, state.turretRotation),
            voteSourceID);

        if(Mathf.Abs(action.turnTurretRight.Value) < firingZonePercentTurretRotation){
            // close enough to desired aim position to shoot
            action.SetFireGun(true, voteSourceID);
            action.SetPriority(priorityWhenEnemyWithinFiringZone, voteSourceID);
        }else{
            action.SetPriority(priorityWhenEnemyOutsideFiringZone, voteSourceID);
        }

        return action;
    }
}
This is a bit different. If no enemy tank is in sight, it returns a no-op vote (by returning a default Action object). However when a enemy tank is spotted, it uses the findShortestTurretRotationToTarget utility function to vote for the turret. We can also see that it votes to fire the gun, but only if the turret is close to aiming at the enemy.
So how are these two Action votes being combined into one Action vote? For that answer, we have to look at the documentation for the Arbiter being used, which says it: "Selects [the] single, highest-priority Action (winner takes all)." So this Agent will return the Action from FindEnemy if no enemy is in sight because it always returns a priority of 0.8. It will then return the Action from PureFire when an enemy tank is in sight because it sets its vote priority to 1.0 in that situation. So the overall behavior is quite similar to the agent Tutorial-2.json, but not exactly the same. And how it is constructed is quite different.
Benefits of Multi-Behavior Agents
Large monolithic pieces of code can be hard to understand and use, which is why we often break them up into reusable pieces. You can think of the UBF as a design patter to do that for Artificial Intelligence. Each Behavior is meant to handle a small portion of the overall logic in a way that allows it to be configured and reused as needed. And while this example used a simple Arbiter, remember that there are no limits to how an Arbiter works as long as it returns a single Action given a set of Actions.
Loading Multi-Behavior Agents
We glossed over the JSON used to load our multi-behavior agent (which has been reproduced below), but it's important to understand how it works. Like the agent from Tutorial-3.json, there is the required Dictionary with the BehaviorType key. This key has the somewhat special value of AT.UBF.CompositeBehavior which requires two other keys: Arbiter and Children.
{
    "BehaviorType": "AT.UBF.CompositeBehavior",
    "Arbiter": { "ArbiterType": "AT.UBF.Arbiters.Priority" },
    "Children": [
        {"BehaviorType": "AT.UBF.Behaviors.FindEnemy" },
        {"BehaviorType": "AT.UBF.Behaviors.PureFire" }
    ]
}
The Arbiter key must have a Dictionary as a value, which in turn contains the required key ArbiterType. The value of this key must be the fully-qualified class name of an Arbiter. Some Arbiters have optional and/or required arguments, which work just like arguments for Behaviors.
The Children key must have an array as its value. This array can hold any number of Behavior children, each of which must follow the rules previously described. That is, they must be in a Dictionary and have the BehaviorType key. This may be somewhat confusing at first, so take a moment to re-read the JSON above.
Note that CompositeBehavior's can be nested in one another, each using whichever Arbiter suites their needs.
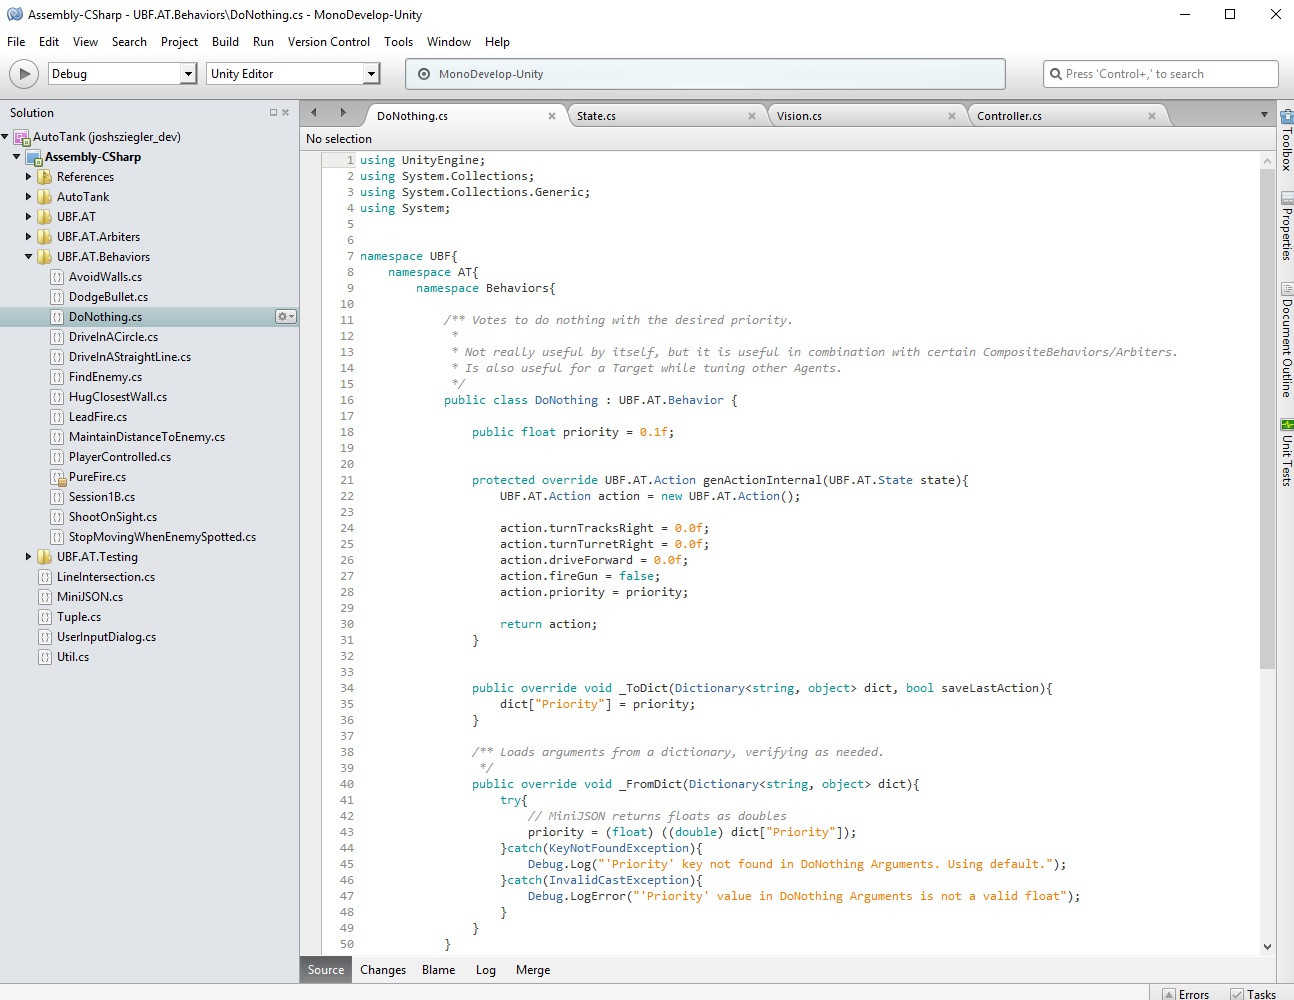
Debugging using MonoDevelop
For this last task, we will teach you how to use MonoDevelop to debug your agents in AutoTank. Unity uses Mono, the open source implementation of Microsoft's .NET framework. In particular, it uses Mono for its C# (C-sharp) compiler and Common Language Runtime. This is important because AutoTank and our implementation of the Unified Behavior Framework (UBF) is in C#.
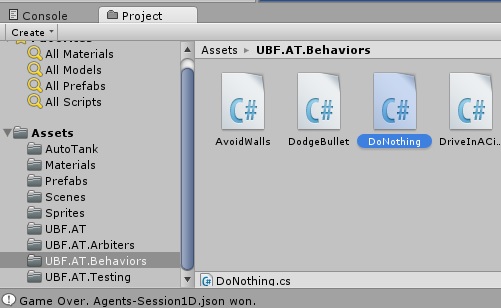
To debug your code, double click on any source file in Unity's Project window (Window > Project). This will open MonoDevelop, which is an open source Integrated Development Environment (IDE). For this task, double click on the AutoTank/Assets/AT.UBF.Behaviors/FindEnemy.cs file.
MonoDevelop should show the AutoTank directory and all of your C# source files on the left hand side (see below).
Setting a Breakpoint
MonoDevelop provides all the standard debugger functionality you are used to. To set a breakpoint in MonoDevelop, simply click the gutter to the left of the line you want to break at (see screenshot below). Alternatively -- with the cursor on the line you want the breakpoint -- press F9.
- With
Tutorial-4.unitystill loaded - Set a breakpoint on line 21 of the
FindEnemy.csfile

- Then, click the big play button at the top left to start the debugger
- Alternatively, you can use the
F5key - Note that nothing happens because Unity is not currently running
- Switch back to Unity and click Play.
Now, whenever the code encounters your breakpoint, Unity will stop responding and MonoDevelop's taskbar icon will blink to notify you that it is waiting. Switch back to MonoDevelop to inspect the code (see screenshot).
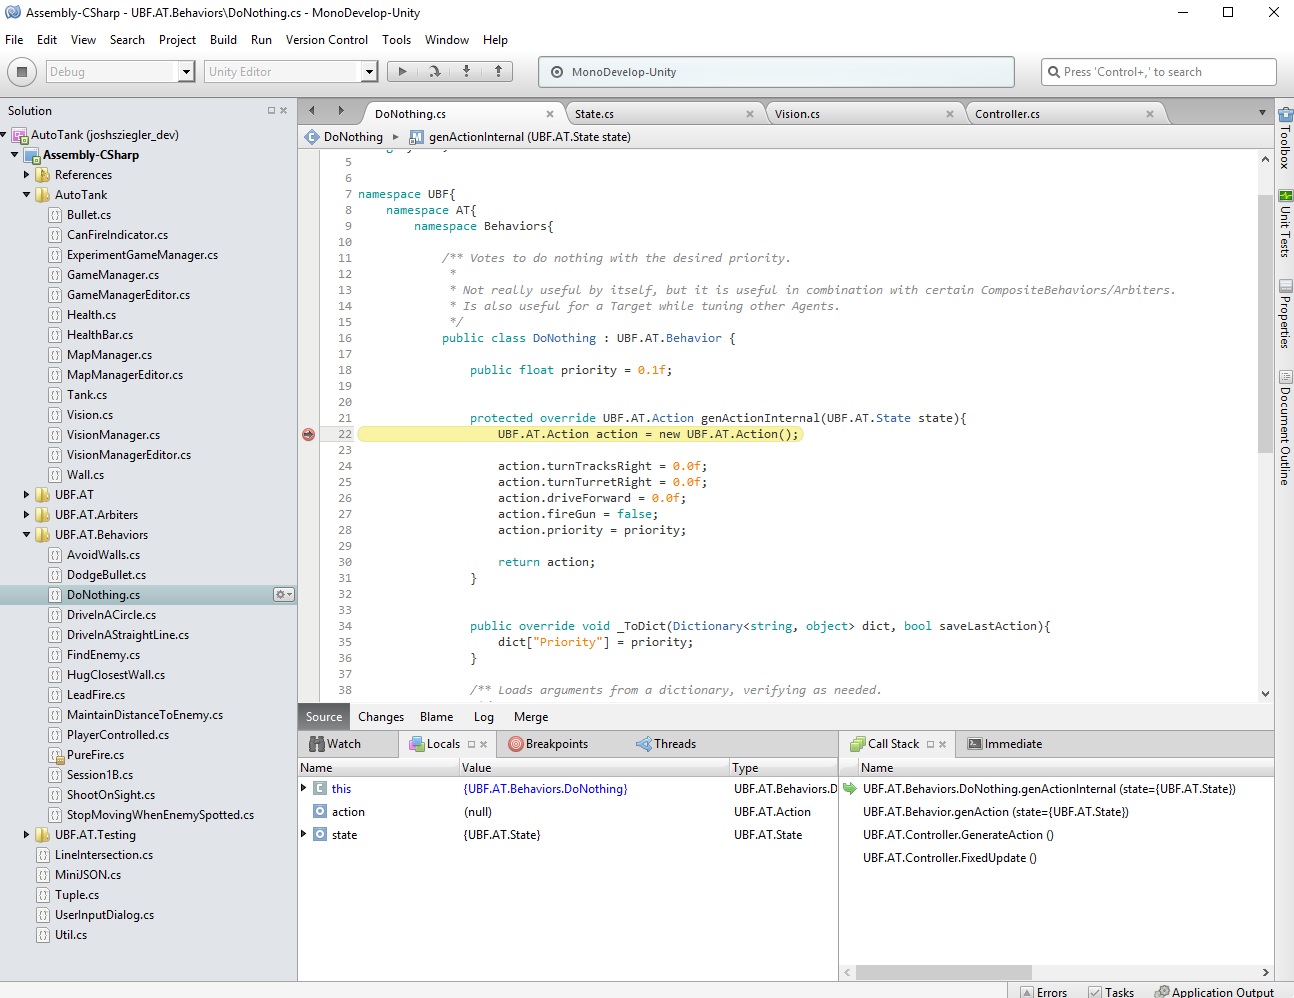
At this point you can inspect the current stack, local variables and step through the code line by line if you like. Take a moment to look around if you like.
Programming Your Own Behaviors
Now it's time to create your own Behaviors. For your first Behavior, try to keep it simple. You may want to copy and then modify an existing Behavior instead of creating your own from scratch.
Tips
- use the the existing Behaviors as examples
- if you encounter problems, the README may help
- remember to keep the Console window open to see errors and debug messages
- look over the Util class which has several helpful functions
- you can store state in your Behavior (e.g. the last known position of the enemy)
Academic Background
Interested in learning more? The following academic papers introduced the UBF and discuss it in more detail:
- Woolley, B., Peterson, G.L., "Unified Behavior Framework for Reactive Robot Control," Journal of Intelligent and Robotic Systems, vol. 55, no. 2, pp.155-176, 2009.
- Draft (robobrarian.info)
- DOI: 10.1007/s10846-008-9299-1. (springerlink.com)
- Woolley, B., Peterson, G.L., and Kresge, J.T., "Real-Time Behavior Based Robot Control System," Autonomous Robots, vol. 30, no. 3, 2011, pp. 233-242.
- Draft (robobrarian.info)
- DOI: 10.1007/s10514-010-9215-y. (doi.org)
Arbiters
Warning: If an argument is listed as a float, it must have a decimal point (i.e. 3 will cause an error but 3.0 will work).
AlternateEveryXSeconds
Alternates in a round-robin fashion between the voting Behaviors every X seconds.
Once a Behavior is selected, it will remain the selected Behavior until X seconds have elapsed OR if it returns a NULL action vote. At that point, this will select the next non-null vote in round-robin order. If there are NO non-null votes, it will select the same Behavior and return its null Action vote. This preserves the order.
If only one child votes, that child's Action is chosen.
| Argument Key | Type | Limits | Example 1 | Example 2 |
|---|---|---|---|---|
Seconds |
float | > 0.0 | 1.5 |
0.25 |
NoOp
Always returns a No-Op Action-Vote (i.e. abstain from voting).
Arbiters are not supposed to create Action-Votes themselves, but this is a special case. Using this Arbiter we can temporarily "disable" part of an Agent's UBF tree by switching the Arbiter to this one for example. This can also be used in tutorials where we want to force the student to choose an appropriate Arbiter.
This is named NoOp rather than DoNothing because the DoNothing Behavior returns an Action that votes (i.e. with all motors set to 0.0 and fireGun to False).
| Argument Key | Type | Limits | Example 1 | Example 2 |
|---|
Priority
Selects single, highest-priority Action (winner takes all).
Warning: If multiple actions have the same priority, this has undefined behavior! It actually returns the first Action with the highest priority, but Action order cannot be guaranteed.
| Argument Key | Type | Limits | Example 1 | Example 2 |
|---|
PriorityFusion
Combines non-conflicting Actions according to priority (higher-priority overwrite motors of lower-priority Actions).
The way I've chosen to implement this is to first order the Action list. This then takes the lowest priority Action as the base Action. We then iterate through the rest in increasing priority order. If the current (higher priority) action sets a given motor (e.g. driveForward) we overwrite our current base Action for that particular motor. This leaves all other motors as is.
If Actions have the same priority, the behavior is undefined due to their nondeterministic ordering.
| Argument Key | Type | Limits | Example 1 | Example 2 |
|---|
Random
Selects randomly from Actions.
| Argument Key | Type | Limits | Example 1 | Example 2 |
|---|
Subsumption
Children are considered in order, with earlier children overriding later children on a per-motor basis.
Example: If we have two children who vote like this: ChildA 0.9 1.0 -- -- fire ChildB 0.9 0.5 -- 0.1 --
The result would be that ChildA, because it is first, wins the priority, forward, and fireGun motors, while ChildB wins the turret motor because A didn't vote for that.
| Argument Key | Type | Limits | Example 1 | Example 2 |
|---|
SubsumptionWTA
Children are considered in order, with the first child to vote being chosen. Winner takes all.
| Argument Key | Type | Limits | Example 1 | Example 2 |
|---|
WeightedRandom
Selects randomly from Actions using their assigned weights (chance of being selected).
The total of all the weights MUST total 100. Internally, these weights are translated into an range of integers. A weight of X will result in that Behavior's Action-Vote being picked X percent of the time.
Example:  Behavior     Weight        Assigned Integers   Selected on Rand Int of
          LeadFire     60 %          1-60                <= 60
          PureFire     30 %          61-90               <= 90
          LagFire      10 %          91-100              <= 100
On each selectAction, this generates an integer between 1-100, picking the Behavior's vote which corresponds to that integer. We iterate through the weights in order, selecting the Action-Vote which has translatedWeight (post) which is greater than the random integer. In this example, if we randomly generated 65, we would start with LeadFire with a post of 60. So we move on to PureFire with a post of 90, so we select its vote (because the random integer is less than or equal to the post value). This logic is difficult to explain, but makes finding which Action to select easy and fast.
Note only the integer weights are saved (and loaded). The translated weights which are used internally are generated from those weights. This prevents any disagreement between the two and clearly define which is considered the "truth."
| Argument Key | Type | Limits | Example 1 | Example 2 |
|---|---|---|---|---|
Weights |
List |
see docs | [10, 75, 15] |
[5, 95] |
Behaviors
Warning: If an argument is listed as a float, it must have a decimal point (i.e. 3 will cause an error but 3.0 will work).
AvoidWalls
Tries to avoid crashing into walls by making the shortest turn.
Warning: can get stuck in corners.
| Argument Key | Type | Limits | Example 1 | Example 2 |
|---|---|---|---|---|
PriorityOnPotentionalWallCrash |
float | [0.0, 1.0] | 1.0 |
0.65 |
CushionInSecondsToCrash |
float | > 0.0 | 1.0 |
DodgeBullet
If bullets are in view, determine if they're in one of three locations: current position, behind the tank, in front of the tank. Move to which ever option has the least incoming bullets.
| Argument Key | Type | Limits | Example 1 | Example 2 |
|---|---|---|---|---|
Priority |
float | [0.0, 1.0] | 1.0 |
0.65 |
Buffer |
float | > 0.0 | 1.0 |
5.0 |
DoNothing
Votes to do nothing with the desired priority.
Not really useful by itself, but it is useful in combination with certain CompositeBehaviors/Arbiters. Is also useful for a Target while tuning other Agents.
| Argument Key | Type | Limits | Example 1 | Example 2 |
|---|---|---|---|---|
Priority |
float | [0.0, 1.0] | 1.0 |
0.65 |
DriveInACircle
Drives in a circle at the desired speed at all times.
| Argument Key | Type | Limits | Example 1 | Example 2 |
|---|---|---|---|---|
Priority |
float | [0.0, 1.0] | 1.0 |
0.65 |
DesiredSpeed |
float | [-1.0, 1.0] | 0.8 |
-0.5 |
DesiredTurnTracksRight |
float | [-1.0, 1.0] | 0.5 |
-0.4 |
DriveInAStraightLine
Drives in a straight line at the desired speed at all times.
| Argument Key | Type | Limits | Example 1 | Example 2 |
|---|---|---|---|---|
Priority |
float | [0.0, 1.0] | 1.0 |
0.65 |
DesiredSpeed |
float | [-1.0, 1.0] | 0.8 |
-0.5 |
FindEnemy
Turns turret until we are looking directly at an enemy. Once one is in sight, try to point the turret directly at them (pure pursuit).
Does not vote on rotating the tracks, driving or firing the gun.
| Argument Key | Type | Limits | Example 1 | Example 2 |
|---|---|---|---|---|
PriorityWhenNoEnemyInSight |
float | [0.0, 1.0] | 1.0 |
0.6 |
PriorityWhenEnemyInSight |
float | [0.0, 1.0] | 0.0 |
0.2 |
TurretTurnSpeedWhenNoEnemyInSight |
float | [-1.0, 1.0] | 1.0 |
0.7 |
HugClosestWall
Drives in a straight line toward the nearest wall at the desired speed until we are within the desired distance (+/- buffer) to said wall. Otherwise does not vote.
Keep in mind the tank's size when setting the desired distance to wall and buffer values. It's very easy to cause the Tank to get hung up on a wall. Optimal values may change depending on the map (wide open vs. lots of walls that are close together).
| Argument Key | Type | Limits | Example 1 | Example 2 |
|---|---|---|---|---|
PriorityWhenNotWithinBuffer |
float | [0.0, 1.0] | 0.5 |
0.8 |
DesiredSpeed |
float | [0.0, 1.0] | 1.0 |
0.75 |
DesiredDistToWall |
float | >= 0.0 | 1.5 |
10.0 |
Buffer |
float | >= 0.0 | 0.8 |
3.0 |
LeadFire
Shoots at an enemy tank with a leading shot (using estimated time of of flight and enemy velocity).
This does NOT vote if no enemy is in sight. When an enemy IS in sight, it tracks the first one in the list.
When the tracked enemy is outside of our firing zone, only vote on the turret rotation. The firing zone is set via argument, and represents the maximum turret turn rotation that we can vote for and still fire at the enemy. For example, a firing zone of 0.1 means we only fire when we vote to turn the turret at 10% of full power.
| Argument Key | Type | Limits | Example 1 | Example 2 |
|---|---|---|---|---|
PriorityWhenEnemyWithinFiringZone |
float | [0.0, 1.0] | 1.0 |
0.7 |
PriorityWhenEnemyOutsideFiringZone |
float | [0.0, 1.0] | 0.8 |
0.35 |
FiringZonePercentTurretRotation |
float | [0.0, 1.0] | 0.1 |
0.25 |
MaintainDistanceToEnemy
If an enemy tank is in sight, maintain a desired distance from it. If needed drive directly toward/away from it.
| Argument Key | Type | Limits | Example 1 | Example 2 |
|---|---|---|---|---|
DesiredDistToEnemy |
float | >= 0.0 | 5.0 |
8.5 |
PriorityOnEnemyFound |
float | [0.0, 1.0] | 0.75 |
0.3 |
NoOp
Always returns a No-Op Action-Vote (i.e. abstain from voting).
This is named NoOp rather than DoNothing because the DoNothing Behavior returns an Action that votes (i.e. with all motors set to 0.0 and fireGun to False).
| Argument Key | Type | Limits | Example 1 | Example 2 |
|---|
PlayerControlled
Controls player control of Tank (i.e. WASD and space bar/mouse button to fire the gun).
This is meant to be used on its own (single Behavior Agent).
| Argument Key | Type | Limits | Example 1 | Example 2 |
|---|
PureFire
Shoots directly at an enemy tank with no lead or lag (pure pursuit aka aim at their current position, ignoring their velocity).
This does NOT vote if no enemy is in sight. When an enemy IS in sight, it tracks the first one in the list.
When the tracked enemy is outside of our firing zone, only vote on the turret rotation. The firing zone is set via argument, and represents the maximum turret turn rotation that we can vote for and still fire at the enemy. For example, a firing zone of 0.1 means we only fire when we vote to turn the turret at 10% of full power.
| Argument Key | Type | Limits | Example 1 | Example 2 |
|---|---|---|---|---|
PriorityWhenEnemyWithinFiringZone |
float | [0.0, 1.0] | 1.0 |
0.65 |
PriorityWhenEnemyOutsideFiringZone |
float | [0.0, 1.0] | 0.8 |
0.33 |
FiringZonePercentTurretRotation |
float | >= 0.0 | 0.2 |
0.0 |
ShootOnSight
Votes to shoot as long as an enemy is within our Field of View. Does not vote on anything besides fireGun.
Does NOT vote if no enemy is in sight.
| Argument Key | Type | Limits | Example 1 | Example 2 |
|---|---|---|---|---|
Priority |
float | [0.0, 1.0] | 1.0 |
0.65 |
StopMovingWhenEnemySpotted
Votes to stop moving (driveForward) whenever an enemy tank is spotted. Otherwise, abstains.
| Argument Key | Type | Limits | Example 1 | Example 2 |
|---|---|---|---|---|
Priority |
float | [0.0, 1.0] | 1.0 |
0.65 |
README
Disclaimer
The views expressed are those of the author and do not reflect the official policy or position of the United States Air Force, Air Force Institute of Technology, Department of Defense, or the U.S. Government.
License
Most of the code is covered by the MIT license. details can be found in AutoTank/LICENSE.md.
End Game Conditions
The default GameManager will end the game if:
- There is only one tank left (that tank wins; score shown)
- There are no tanks left (user forgot to add tanks to the scene or the tanks simultaneously died)
- Two or more remaining tanks which are all on the same team are left (that team wins; scores are shown)
- Time limit is exceeded (only remaining tanks' scores are shown)
Scoring
The default GameManager uses your tank's remaining health as its score. In the future, this would ideally factor in damage dealt (add damage dealt the enemy tanks, subtract damage dealt to teammates).
Time Limit
The time limit can be set on the GameManager in the Inspector view.
Assigning Teams
A tank's assigned team can be set in the Inspector window under the Controller section. Selecting None will result in that Tank having to win on its own.
For example, if four agents are fighting (A, B, C, D) where A and B are on team Alpha, but C and D are on None...
- A and B can win the fight as a team, with both or either one remaining at the end
- However C and D must win it for themselves, meaning if they are the only two remaining, they must continue to fight
Agent Persistence
Agents can be loaded from JSON files. To load a single behavior, use a single dictionary with the required 'BehaviorType' key.
{
    "BehaviorType": "AT.UBF.Behaviors.FindEnemy"
}
Some Behaviors have optional and/or required arguments. This depends on that Behavior's _FromDict() method.
{
    "BehaviorType": "AT.UBF.Behaviors.DriveInACircle",
    "TurnTracksRight": -0.25
}
A CompositeBehavior requires Arbiter and Children keys in its dictionary. The Children key must be a list of dictionaries (of Behaviors).
{"BehaviorType": "AT.UBF.CompositeBehavior",
 "Arbiter": { "ArbiterType": "AT.UBF.Arbiters.PriorityFusion" },
 "Children": [
     {"BehaviorType": "AT.UBF.Behaviors.AvoidWalls"},
     {"BehaviorType": "AT.UBF.Behaviors.DriveInACircle", "TurnTracksRight": -0.25 },
     {"BehaviorType": "AT.UBF.Behaviors.FindEnemy"}
 ]
}
Enabling Persistence in New Behaviors
All Behaviors that are derived from AT.UBF.Behavior should work with this persistence system. If the Behavior has optional/required arguments or needs to save internal state, override the _ToDict() and _FromDict() methods:
public override void _ToDict(Dictionary<string, object> dict){
    dict["TurningSpeed"] = this.turningSpeed;
}

public override void _FromDict(Dictionary<string, object> dict){
    this.turningSpeed = (float) dict["TurningSpeed"];
}
In most cases, the resulting Dictionary will be persisted to a file as JSON. This means that only JSON supported types are supported in the Dictionary (int, float, string, bool, etc)! If you have complex data structures such as a Vector2, you must handle this conversion yourself.
It's recommended that you carefully check the data for validity and handle errors within _FromDict. Be sure to look for KeyNotFoundException and InvalidCastException which are the most common errors. You may re-throw these exceptions (stopping the load) which will be caught by FromDict(). If FromDict() or ToDict() encounter errors, they will return NULL.
The MiniJSON library used for serializing the Dictionary will return floats as double and int as long among other things. See Assets/MiniJSON.cs for more details. Use Util.FloatFromJsonDict() to make this easier and cleaner in your code. See the example below:
public override void _ToDict(Dictionary<string, object> dict, bool saveLastAction){
    dict["TurningSpeed"] = this.turningSpeed;
}

public override void _FromDict(Dictionary<string, object> dict){
    string bName = this.GetType().Name;
    this.turningSpeed = Util.FloatFromJsonDict("TurningSpeed", this.turningSpeed, bName, dict);
}
Loading An Agent Via JSON
With a Tank's top level GameObject selected, look in the Inspector for a Component named "Controller." Expand this Component if necessary and find the "Current Agent Path" header and under that, a "Load" button.
Click the button and location the JSON file you wish to use for this Agent. By default, it will look in the AutoTank/Agents/ folder.
After hitting "Play" it will attempt to load what you entered. This means the Console might show a failed attempt to load an agent.
Why Won't My Agent Load?
The first place to look is Unity's Console (click Window > Console if you closed it). I've made an attempt to catch and log errors as close to the source as possible. You should be able to find the exact line of the error if there was an Exception.
If you are using only the included Behaviors, you likely have a missing key-value pair or have a spelling error. See above for examples and rules on the format.
If you are using Behaviors you or someone else wrote, if may be that you didn't derive them from AT.UBF.Behavior or didn't override _ToDict() and _FromDict(). By default, the persistence code assumes it can create a Behavior without any constructor arguments. All internal state or arguments must instead be passed via these two methods. The next most common problem is in casting data types.
Why Didn't You Use Unity's Serialization?
I initially did. However I quickly ran into a few issues, some of which are outlined here:
- http://blogs.unity3d.com/2014/06/24/serialization-in-unity/
- http://www.codingjargames.com/blog/2012/11/30/advanced-unity-serialization/
Polymorphism, null and tree structures all require custom code for Unity to properly handle. Basically, you have to carefully consider your Class hierarchy and how certain data types are stored. It isn't as easy as marking a class [System.Serializable] or deriving from UnityEngine.Object. I may eventually change my mind and make everything work with Unity's serialization system, but for now I think mine is fairly simple and functional.
Why Didn't You Use XML?
I used XML for a previous iteration of this project, but personally find XML too verbose to write and edit by hand. I wanted users to be able to write their agents by hand if needed since there is no GUI for creating agents. YAML might have been a good choice, but I was more familiar with JSON. In the future, I might add other options.
Coding Style
Tabs vs Spaces
Please use four spaces for indentation instead of tabs. This isn't a big deal, but keepings things uniform helps.
FAQ
When is Awake, Start, Update, FixedUpdate, etc. called?
See the flowchart below taken from: http://docs.unity3d.com/Manual/ExecutionOrder.html

Private Class Members Are Reset When I Hit Play
This is due to Unity's Serialization system: http://docs.unity3d.com/ScriptReference/SerializeField.html
Public members do not have this problem, but you can mark your private fields with SerializeField to prevent this:
[SerializeField]
private string currMapFile;
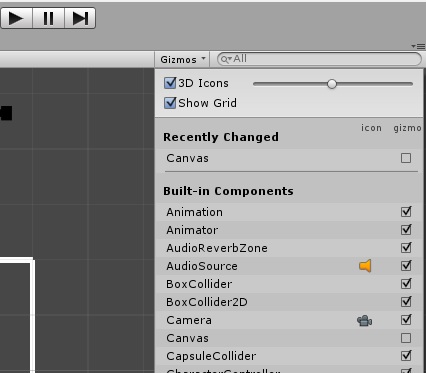
A white box appears around the tank's health bar even when it should be hidden by Fog of War
You probably have Gizmos on. Click the Gizmos menu on the Scene view and deselect Canvas.
A green box gives the enemy tank position away
You probably have that tank selected (in the Hierarchy window). To fix this, click on something else such as the GameManager in the Hierarchy window.
Changes made to GameObject using a custom editor/inspector don't stick when I hit Play
You likely haven't called EditorUtility.SetDirty(someGameObject); which Unity uses to "find out when assets have changed and need to be saved to disk." See the Unity documentation for more info.
If you make a custom editor/inspector and the GameObject reverts to its Prefab settings, this is likely the cause.
I can fire the tank's gun and rotate its turret, but I cannot move (PlayerControlled)
The Game view probably doesn't have focus. Whenever you switch between the Unity editor (e.g. Inspector, Console, Dialog boxes) the game will not receive your key presses. Click on the game view with your mouse and you should be good to go (not the Scene view).
Help, I need to time a Function/Method
The quick and dirty way is to do something like this:
float start = Time.realtimeSinceStartup;
YourFunctionName();
Debug.Log(String.Format("{0} took: {1} seconds.", "YourFunctionName", (Time.realtimeSinceStartup-start)));
You could write a function which accepts a function as a parameter and does this, but then you have to worry about return values.
These Behavior/Arbiter/Argument names are long, why not make them shorter?
I agree they are annoyingly long, but I keep getting comments from users that they misunderstood what they do. For example, the FindEnemy Behavior was thought to drive the tank's tracks by one user (it only turns the turret). This was noted in the documentation and is easily apparent by looking at the code, but I still got lots of comments along these lines.
So, I decided to make them more descriptive, but obviously they get annoying quickly. I don't know how else to solve the problem.
Why is there a [TOC] in these Markdown files?
This marks where we want our Markdown processor to insert the Table of Contents (for conversions to HTML, PDF, etc).
Versioning
AutoTank uses Semantic Versioning.
Given a version number MAJOR.MINOR.PATCH, increment the:
MAJOR version when you make incompatible API changes, MINOR version when you add functionality in a backwards-compatible manner, and PATCH version when you make backwards-compatible bug fixes.
This is obviously up to the current maintainer to follow. However, some of the biggest breaking changes are listed below.
Version 3.0.0
This version introduced tank's color as a unique ID, team battles, team communication, refactored the State class and reworked the documentation.
- Team battles were added, allowing the team to work together and win rather than just free-for-all
- Assign an agent to a team using the Unity Inspector
- Agents can use the static method
AT.Tank.SendMessage()to send a message to a single teammate or the entire team AT.Messagerequires standard information about the sender and receiver, and only allows strings to be passed- However, you can also serialize data to a string and send that (e.g. via MiniJSON)
- The
Stateclass was refactored to use the newTankStateclass rather thanTuple,Triple, etc. to represent other TanksTankStaterepresents an individual Tank, whileStateholds references to them and any global informationTankStatealso provides the Tanks' color, which is now treated as a unique IDStatenow holds messages sent to the Agent since the last tick
- The provided Markdown documentation was updated and moved to the
Documentationdirectory (including the README.md)- A Python script is now available to create a single, combined HTML file from all of the available Markdown documentation
Version 2.0.0
Several name changes were made to make things more concise and uniform.
- All namespaces of the form
UBF.AT.*are nowAT.UBF.* - The namespace
AutoTankis nowAT - Removed underscore from JSON keys:
_BehaviorTypeis nowBehaviorType_ArbiterTypeis nowArbiterType
- Added
Util.QuitImmediately()which attempts to stop the game immediately as is used for unrecoverable errors - Removed all code used for Josh Ziegler's experiment 1
Version 1.1.0
This is essentially the first usable version of AutoTank. It includes a significant portion of code related to Josh Ziegler's experiment 1, however.
Licensing
AutoTank's code is covered by the MIT license. Exceptions and further details on those licenses are provided below.
License and Copyright Exceptions
The following are either assets covered by a different license than the rest of the project, or code from a different author.
- MIT License - Copyright (c) 2013 Calvin Rien
- /Assets/MiniJSON.cs
- MIT License - Copyright 2010-2016 Grumdrig (from Stack Overflow)
- Assets\Util.cs (portions of this file)
- MIT License - Copyright 2014 Rickz0r (from Stack Exchange)
- Assets\AT\Vision.cs (portions of this file)
- Creative Commons Attribution v4.0 (CC BY) - Copyright 2016 Air Force Institute of Technology (AFIT), United States Air Force
- /Assets/Sprites/bullet.png
- /Assets/Sprites/cursor.png
- /Assets/Sprites/tank.lip
- /Assets/Sprites/tank.png
- /CanvasGizmo.jpg
- /ControllerScriptInspector.jpg
- /GameManager_TankColors_01.jpg
- /GameManager_TankColors_02.jpg
- /Tutorial/AutoTankScene01.jpg
- /Tutorial/AutoTankScene02.jpg
- /Tutorial/AutoTankScene03.jpg
- /Tutorial/AutoTankScene04.jpg
- /Tutorial/AutoTankScene05.jpg
- /Tutorial/AutoTankScene06.jpg
- /Tutorial/AutoTankScene07.jpg
- /Tutorial/AutoTankScene08.jpg
- /Tutorial/AutoTankScene09.jpg
- /Tutorial/AutoTankScene10.jpg
- /Tutorial/AutoTankScene11.jpg
- /Tutorial/ControllerScriptInspector.jpg
- /Tutorial/MonoDevelop01.jpg
- /Tutorial/MonoDevelop02.jpg
- /Tutorial/MonoDevelop03.jpg
Code From Stack Exchange
As of March 1, 2016, all code from Stack Exchange websites (including Stack Overflow) uses the MIT License as explained here. Therefore, all uses of snippets or modified code from Stack Exchange requires attribution.
The MIT License
Read an explainer here.
MIT License
Copyright (c) 2016 Air Force Institute of Technology (AFIT), United States Air Force
Permission is hereby granted, free of charge, to any person obtaining a copy of this software and associated documentation files (the "Software"), to deal in the Software without restriction, including without limitation the rights to use, copy, modify, merge, publish, distribute, sublicense, and/or sell copies of the Software, and to permit persons to whom the Software is furnished to do so, subject to the following conditions:
The above copyright notice and this permission notice shall be included in all copies or substantial portions of the Software.
THE SOFTWARE IS PROVIDED "AS IS", WITHOUT WARRANTY OF ANY KIND, EXPRESS OR IMPLIED, INCLUDING BUT NOT LIMITED TO THE WARRANTIES OF MERCHANTABILITY, FITNESS FOR A PARTICULAR PURPOSE AND NONINFRINGEMENT. IN NO EVENT SHALL THE AUTHORS OR COPYRIGHT HOLDERS BE LIABLE FOR ANY CLAIM, DAMAGES OR OTHER LIABILITY, WHETHER IN AN ACTION OF CONTRACT, TORT OR OTHERWISE, ARISING FROM, OUT OF OR IN CONNECTION WITH THE SOFTWARE OR THE USE OR OTHER DEALINGS IN THE SOFTWARE.
Creative Commons Attribution v4.0
Read an explainer here or here. The full legal version is available here.